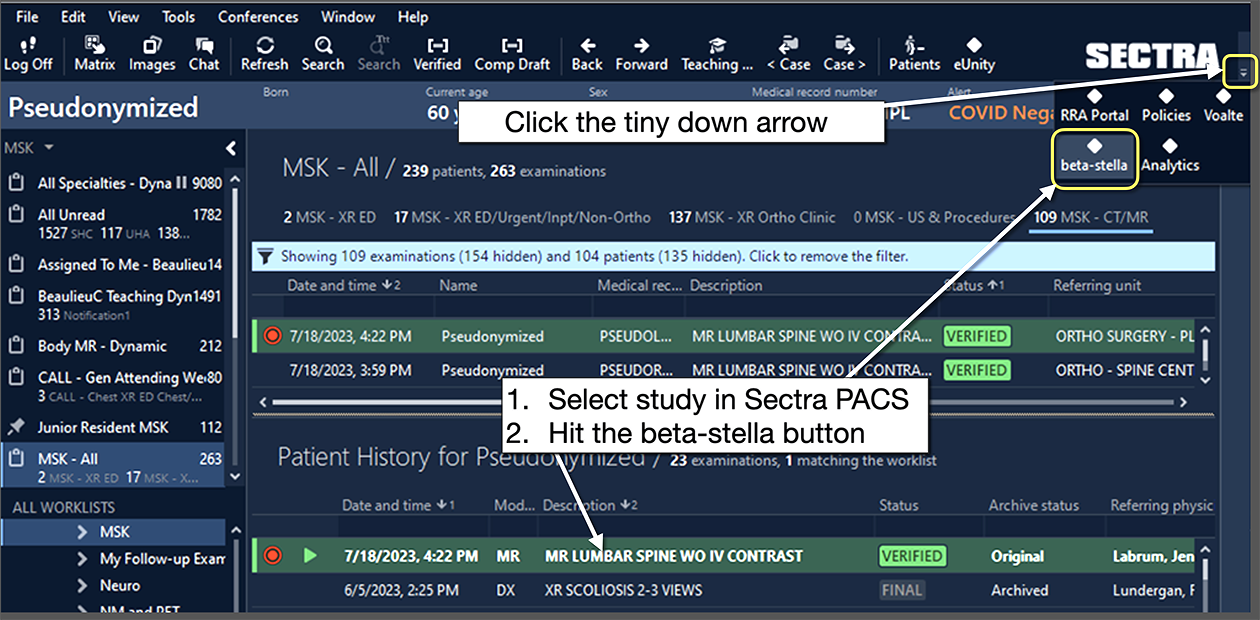
To begin a teaching file, highlight the exam in Sectra and hit the beta-stella (later will just be STELLA) button which may be hidden under the TINY DOWN ARROW icon next to the SECTRA Name (yellow box). This will launch STELLA in a new window on the Edge browser. Single sign-on will authenticate you as the STELLA case author. A logon will be created if you don’t already have one. If a case was previously saved as a TF, you will be taken directly to the case in the Stella Display page. |

| To create a robust, searchable resource, STELLA requires recording of “Core” or basic anatomy, findings and/or diagnosis, and radiology specialty. Notice that the checkmarks are red, indicating that these fields are required. If a term is missing, you can use “unlisted” and type in more information when editing the file later. |

| At least one term needs to be entered for each of the required fields. You will be able to add more terms later. The checkmark icons turn green, validating the term. You then have three basic options about the case: (1) Save Teaching File will save the TF without image display. Selecting significant series is optional for this choice. You will be taken to the Search page; (2) Save Teaching File & Display requires selection of up to 4 significant series, and once done, will save the TF and open the case in the Display page; (3) Discard will ignore the case and you can go back to PACS, PowerScribe, or any other application. |

The Display Page shows up to four image viewports. Workflow related to organization of cases is on the left in the Projects drawer (more later) and on the right in the Annotation drawer (more later). The drawers can be open or closed (yellow boxes). |

Annotations are template-based, and templates are fully customizable regarding categories and structured terms within each category. The main TF template contains fields pertinent to teaching, but the majority of these are optional. Only the three initial required terms – Anatomy Core, Findings and Diagnosis, and Specialty, as well as “Case Title” are required to validate and update a TF. |

Up to four viewports can be displayed. X Close All will close all viewports and take you to the Search page. Viewports can also be individually closed or expanded to full screen and shrunk back using the icons. Scroll through images with the middle mouse wheel or the scrollbar on the right of each viewport. Series can be changed with the dropdown menu (all viewports will reload). On the right, the yellow annotate icon allows you to create image level annotations with or without graphics (more later). (This icon also lets you create a new case level Teaching File but this will result in more than one TF for the case and is not recommended). More about image manipulation and annotation tools in the next panel. The series dropdown menu now shows “1 Ann” for example, to indicate that a series has significant image or graphic annotation. |

Standard tools for image viewing are on the left. The most useful graphic annotation tools are point, line, arrow and circle. Clicking one of these will open the Significant Image annotation panel, allowing association of the graphic with an optional text description. Segmentation tools on the right are for more advanced image measurement and segmentation. |

On the Search Page, click on a patient name to open any case. This will either display the images in the Display Page or ask you to select series to open (up to 4). There are multiple ways to discover cases in Stella, including broad-based search, filtering by specialty, modality, anatomy and diagnosis, as well as sorting and further filtering of columns by alphabetical or temporal order. All search fields can be easily cancelled if needed (see the icon to the right of the main search box). |

Explore the master list called “Teaching Files” using search, filter, and sort. After discovering cases of interest, they can be selected and organized further into other Projects (analogous to folders on your personal computer). Use the selection boxes at the left or the top box to select all (or deselect all). Then you can “Copy to Project” with the icon as highlighted. |

Create a new Project by clicking the GEAR Icon and filling in the fields. Projects can be either public (viewable by all) or private. Once a project is created, you can click on the “users” list and add or remove users for either public or private projects. In the project drawer, as a user you will only see projects that are your own private projects or ones that are assigned to you. |

Worklists represent a set of links to cases that can be assigned to individual learners that are tasked with operations like annotating a finding on the case or answering a text-based question. |

After clicking the GEAR icon to open the Worklist window, you can edit the “Assignees” to add or delete users and you can edit the “Requirement” column to add or change tasks, which can be at the patient, study, or series level. |

The Study List page is a basic listing of all cases in Stella at the DICOM exam level. You can open a case by clicking on the Patient Name (or any other entry in the row). Columns can be selected or deselected, re-ordered and resized. Sort the columns by clicking the title. Filter using the white boxes. |